The purpose of Checklists is to provide a configurable set of 'To Do' list items linked with a record so that Users follow an established process.
For Candidates, this is often the onboarding process to ensure all necessary compliance documentation is gathered before the Candidate can be considered for a Requirement.
For Companies, this is often a Terms of Business process linked with items relevant to establishing an ongoing business relationship.
For Leads, this will be the Sales process for working a Lead through an established Business Development Process.
For Requirements, this is often the onboarding process of taking on a role from a Contact and ensuring all the relevant information is gathered.
For Placements, this is often an audit trail of contractual and back office processing tasks to complete the needs of a Placement.
Example Checklist
Configure Checklists
Checklists are configurable to those with Admin access. They are enabled via Global Settings, these set whether the Checklist tab is visible on the record type and the naming convention of the tab (i.e. some may refer to this area as "Compliance").
Checklists are setup within the Templates section under Checklists:
There is an 'Entity' drop down within the Checklists page, select the Entity type and the relevant checklist will appear.
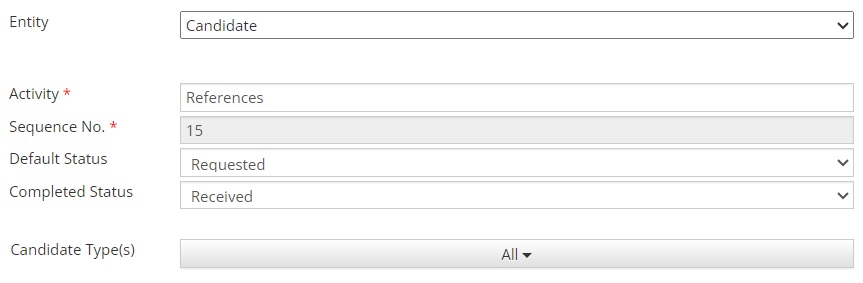
Create Checklist Item
Click on "New Checklist Item":
This then brings you to the page where you input all the information required for your checklist.
Activity - Is the name of the task you would like to add to the Checklist
Sequence No. - This is the order the item will appear in the checklist (later controlled with arrow keys on the table)
Default Status (optional) - This sets the status of the item when the checklist is first created.
Completed Status (optional) - This sets the status of the item when it is completed via the 'Mark As Complete' workflow.
If the item is for the Candidate Checklist, there will be an additional option:
Candidate Type - This allows you to configure whether the item appears on the Candidate Checklist, based on their assigned Type.
If the item is for the Placement Checklist, there will be two additional options:
Carry Over - These settings dictate the checklists which are carried across from a Placement to an Extension and/or Amendment. The three options are:
No - Do not carry over the Placement Checklist item
Carry Over With Data - Carry over the Checklist item to the Extension/Amendment, and retain the data/document entered against the checklist item on the original Placement
Carry Over No Data - Carry over the Checklist item to the Extension/Amendment, but do not include the Checklist entered against the original Placement
Default Set - Yes/No, this sets whether the item is added to the Placement Checklist by default. This option is necessary as the Placement Checklist supports the ability to add and remove items from the Checklist.
Checklist Alerts
Checklist items against the Candidate, Company and Placement entity can also be configured with either a 'Warning' or 'Stop' alert for certain workflows if the items have not been completed.
None means there are no restrictions applied from the item
Alert warns the user, but allows the process to proceed
Stop prevents the user from progressing the workflow without the checklist item being completed
The Checklist Alert options are listed beneath the checklist item:
If a checklist item is not complete, when running the associated workflow you will see these messages:
Warning Alert
Stop Alert
The full list of available alerts are:
Candidate
Spec CV To Contact(s)
Longlist To Requirement
Shortlist To Requirement
Send CV
Arrange Interview
Make Offer
Accept Offer
1st Level Authorise Placement
2nd Level Authorise Placement
Company
Create Requirement
Spec CV Send
Send CV
Arrange Interview
Make Offer
Accept Offer
1st Level Authorise Placement
2nd Level Authorise Placement
Placement
1st Level Authorise Placement
2nd Level Authorise Placement
When ready, select "Save Checklist Item" to add the activity to the Checklist.
Delete Checklist Item
When in Admin under the Checklists area, select the applicable entity, choose the checklist item you wish to delete and press on the 'Delete Checklist Item' icon in the toolbar:
A confirmation alert will appear, select "Yes" to delete the item.
NOTE: All data held against this Checklist Item on all records will be deleted with the checklist item.
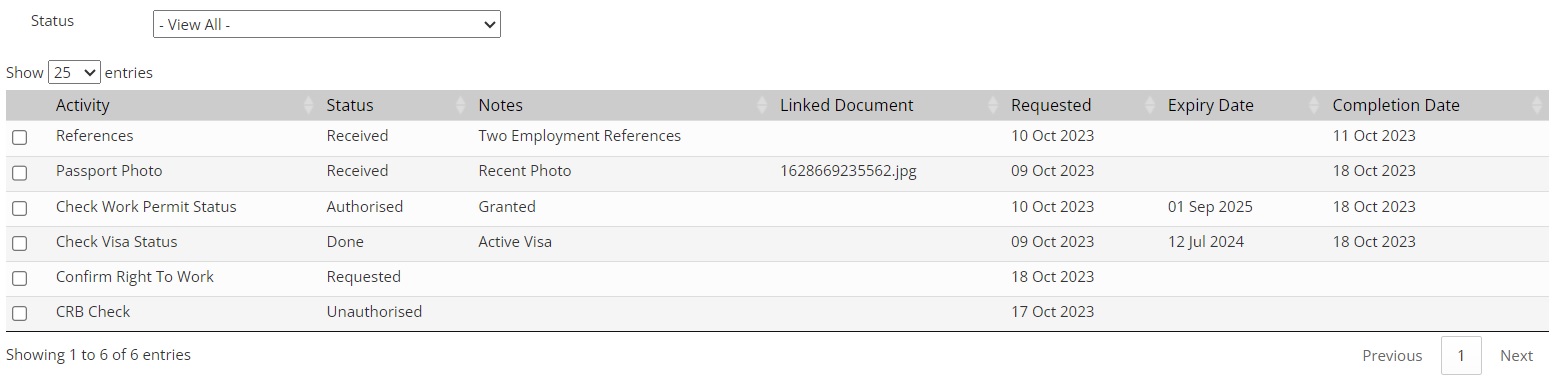
How To Use Checklists
When on an entity record, the Checklist tab will be visible among the available tab options:
The Checklist will appear as a table, including a Status filter:
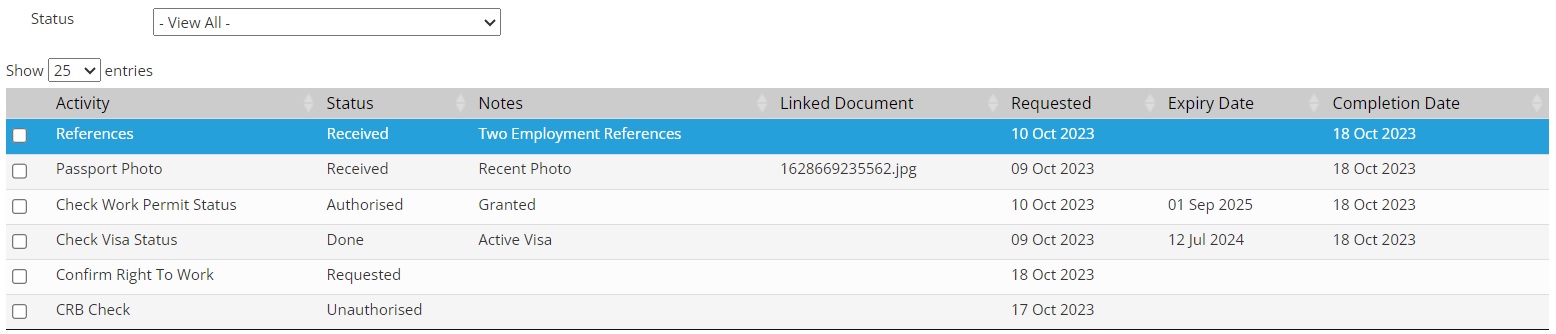
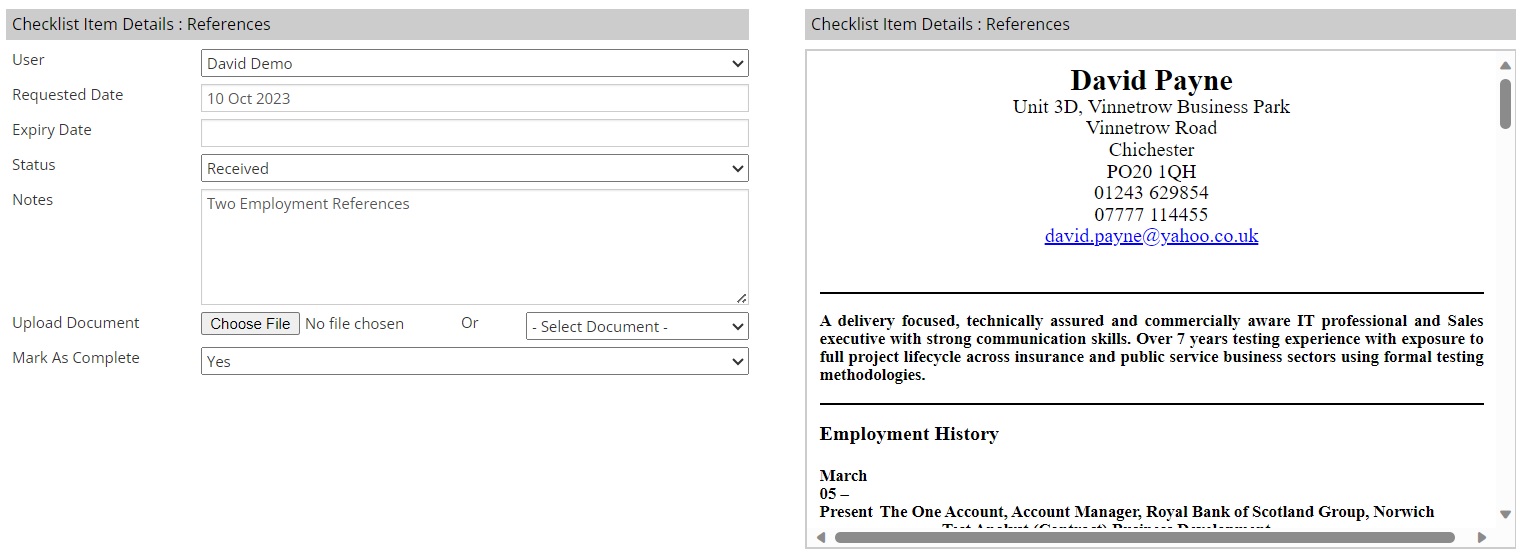
On selection of a Checklist item, it will open the Activity to show the details:
These details include:
User - The individual working on this activity.
Requested Date - When this detail was requested from the Candidate
Expiry Date - The expiry date of the item (i.e. Visa, Passport)
Notes - Freetext area to store additional information as and when required
Upload Document - You can either select a document to upload to the Checklist item via "Choose File" or select a document that has already been added to the record
Documents uploaded to a Checklist item will be held on the record and also accessible via the Documents tab.
Documents can have their association to a Checklist item be removed by selecting 'Remove Document' when on the Checklist item.
Mark as Complete - Yes/No option to manually confirm if the item is delivered.
To mark the Checklist Item as 'Complete', select the tick box next to the activity name and select "Mark as Complete" from the toolbar or right click menu. The Completion date of a Checklist is set with "today's date" when a Checklist item has been completed.
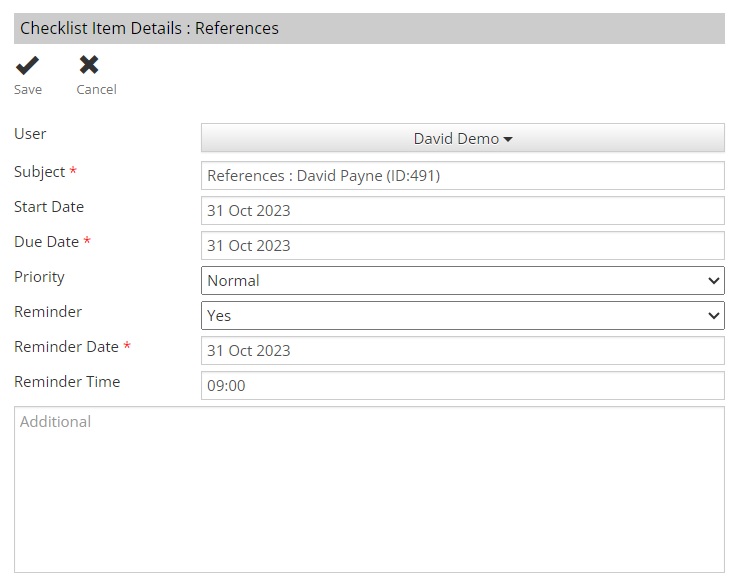
Creating a Task From a Checklist Item
The purpose of a Checklist Task is to prompt the User to follow up on an item and ensure it is completed. When selecting a Checklist Item, an option will be available from the toolbar to "Add Checklist Task":
This will prompt the Task form to appear:
The Subject field will be pre-populated with the name of the activity and the record name & ID. When ready, select "Save" and this will create the Task. As standard, the Task will be linked to the record with a hyperlink contained within the message body of the Task.

 Configure Checklists


 Checklist Alerts


 Related Videos