Back Office User GuideBack Office workflows in Colleague, from Candidate and Company details through to Placements and invoicing.
In this guide
Candidates
Payment Details, Bank Details, Timesheets Company
Invoice Details, Purchase Orders, Bank Details Placement
Authorisation, Workflows, Rates, Timesheets, Charges Back Office
Generate Invoices, List Invoices, Manual Invoice / Credit  Candidates Candidates
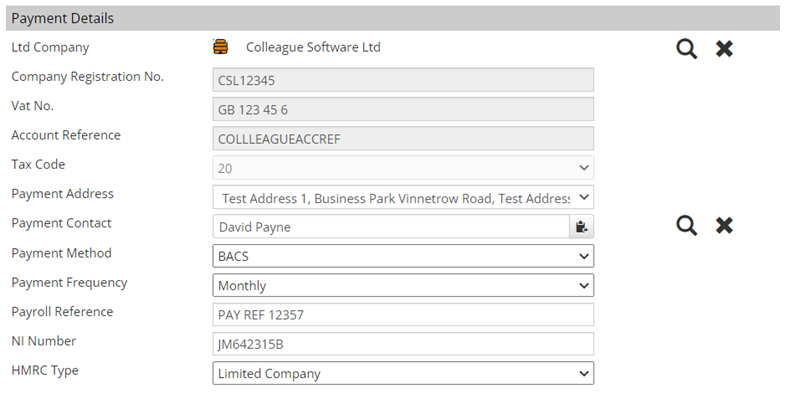
The Payment Details in the Candidate record represent the default values which are later copied into a Placement when the Candidate is placed. Access to these details can be controlled via a User Group Permission to ensure only authorised users have access to this information. When in a Candidate, go to 'View More' and select 'Payment Details':
The LTD Company field can either be freetext or specifically linked to a Company record (by clicking the magnify glass).
If a Company record has been selected as the LTD Company of the Candidate, the following fields are brought through from the Company:
The Payment Address dropdown will also be updated to include the Addresses from the Company. The Payment Contact field can be either freetext or linked to a Contact record (by clicking the magnify glass).
You can also click on the icon to the right of the field to paste in the Candidate's name.
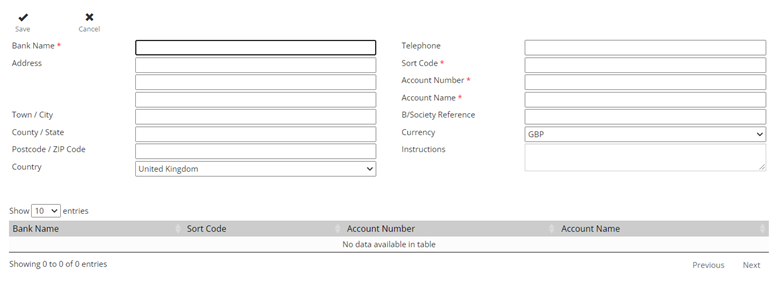
A Candidate's Bank Details can be stored against the Candidate record and selected from the Placement later into the process. All details are stored with encryption to ensure maximum security. Access to these details are also controlled via a User Group Permission to ensure only authorised users have access to this information. When in a Candidate, go to 'View More' and select 'Bank Details':
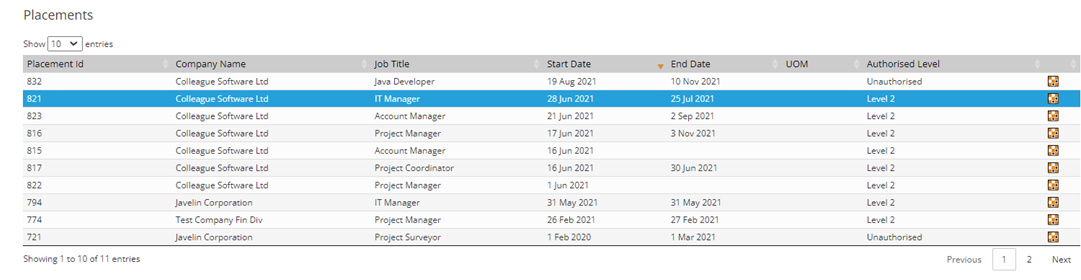
When retrieving Timesheets for a Candidate, you can access their Placements via the Timesheets option. Go to 'View More' and select 'Timesheets':
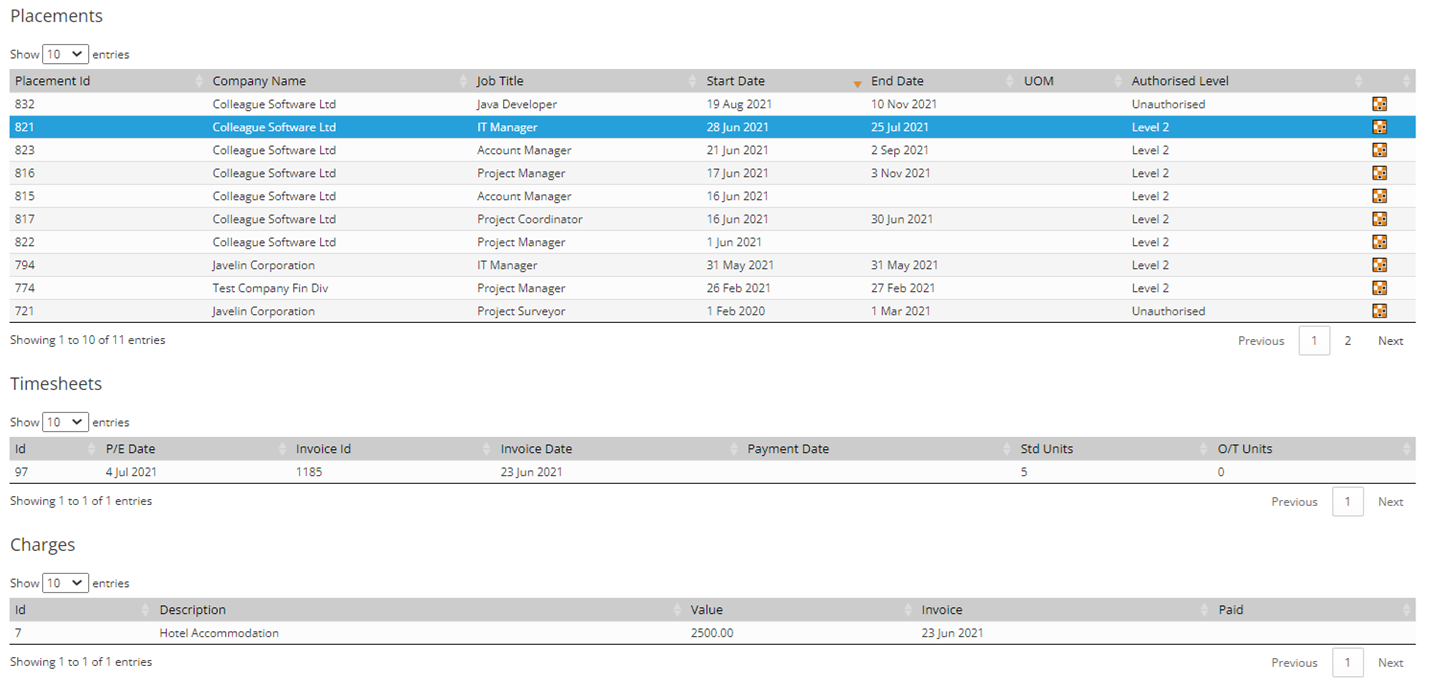
On selection of a Placement, it will show the Timesheets and Charges that have been raised against that Placement for your reference:
To access the Placement, you can click on the Placement icon (or to open in a new tab, right click and 'Open in New Tab'):
 Company Company
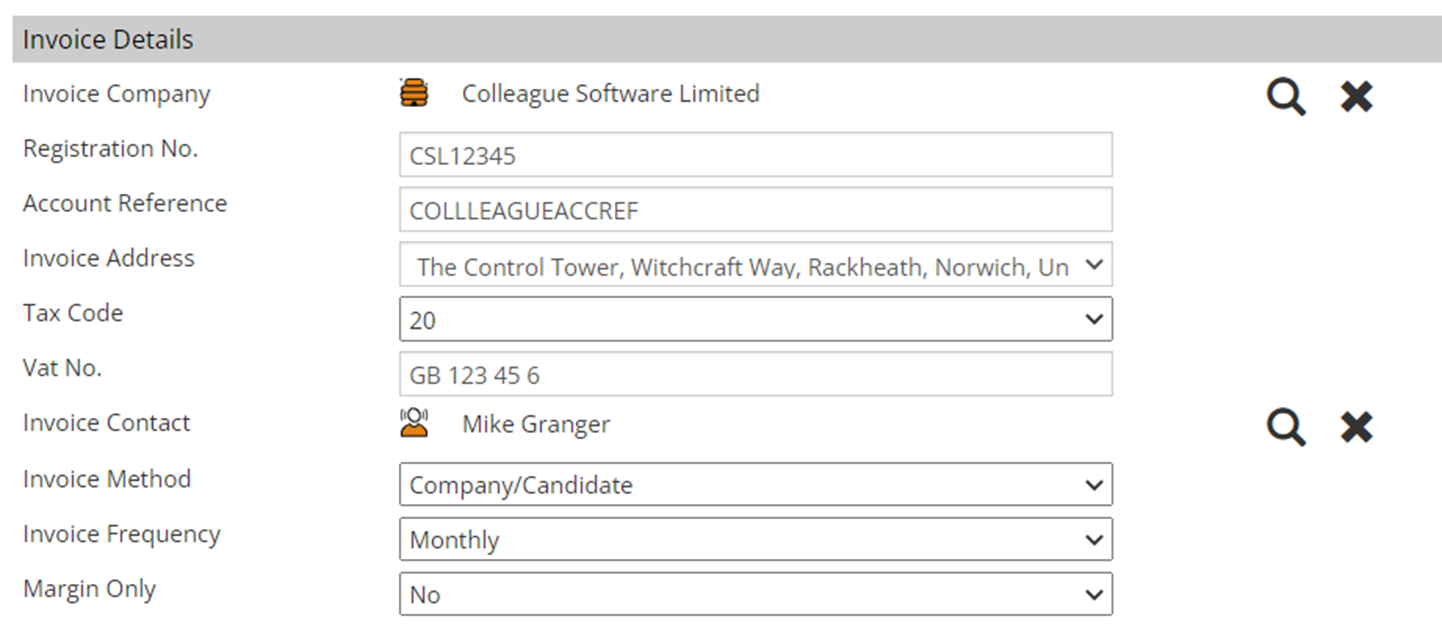
The Invoice Details on the Company record represent the default values which are later copied into a Placement when a Placement is made with that Company. Access to these details can be controlled via a User Group Permission to ensure only authorised users have access to this information. When in a Company, go to 'View More' and select 'Invoice Details':
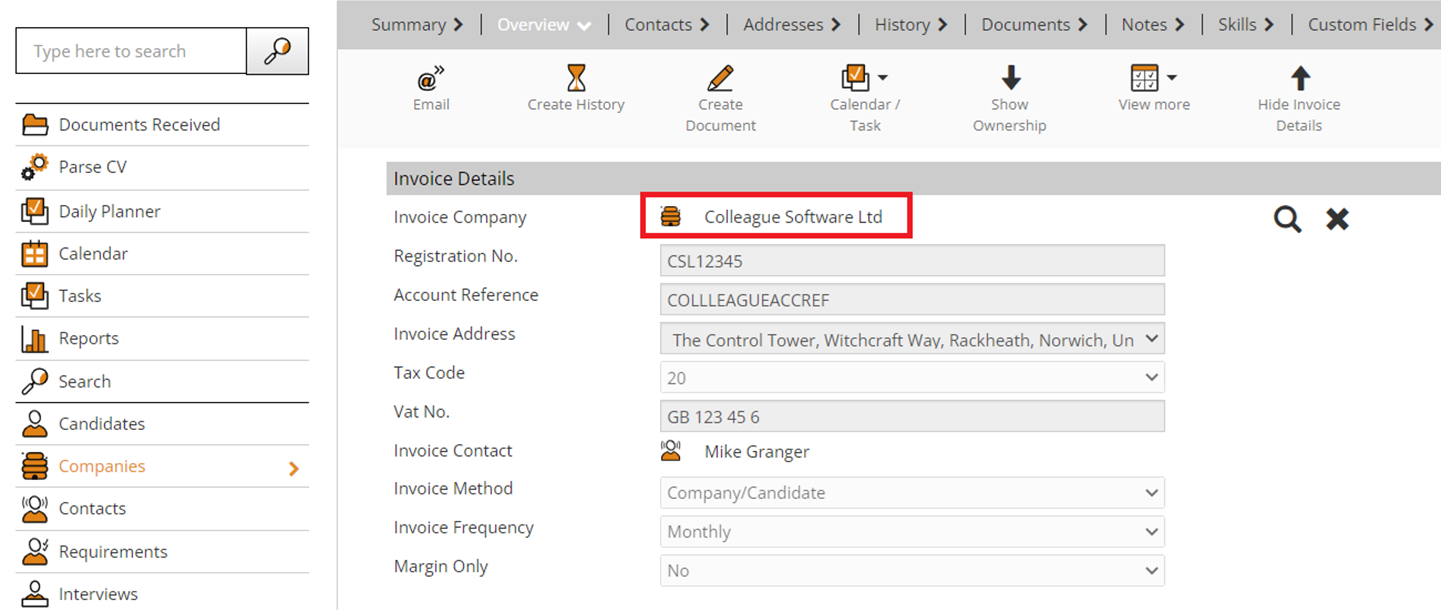
The Invoice Company by default will be the Company record, however for scenarios where the Invoicing Company is different, you will be able to select another Company record by pressing on the magnify glass icon. On selection of another Company as the Invoice Company, the Invoice Details of that selected Company will be pulled through to be shown in read only format.
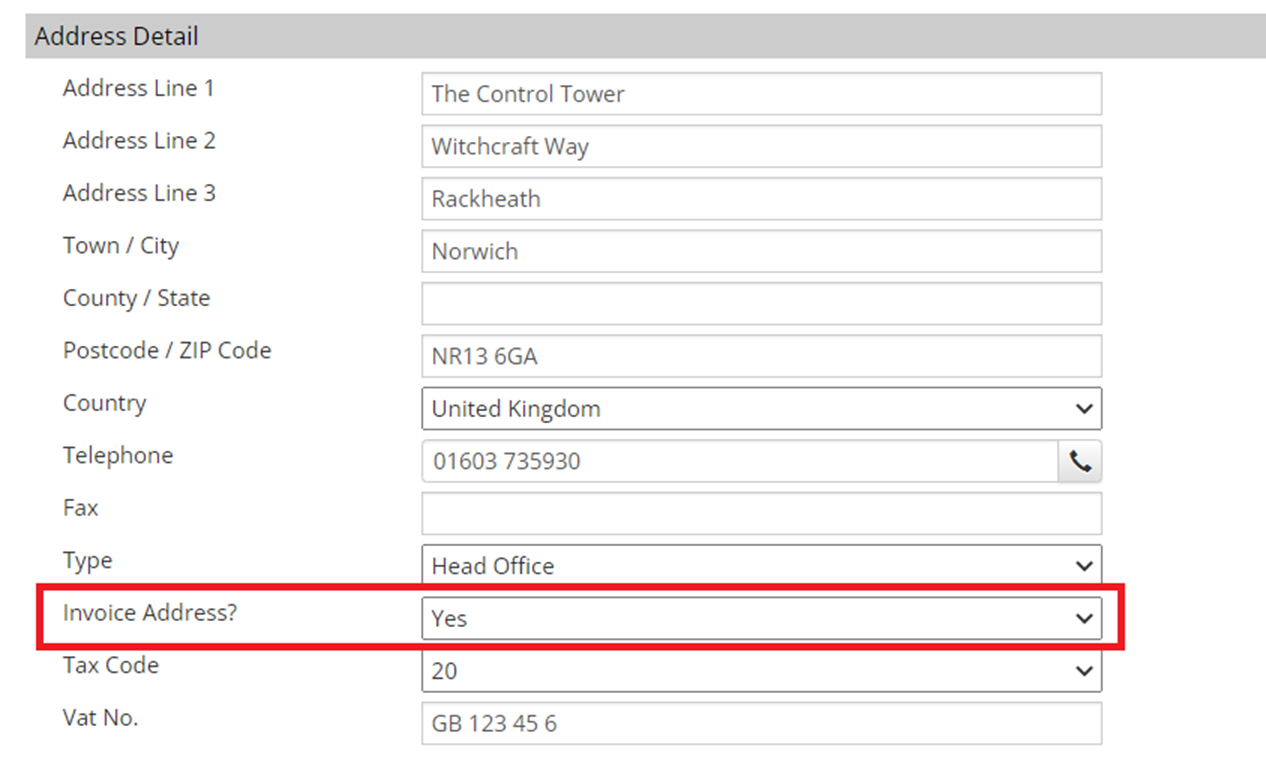
The Invoice Address field will consist of all of the Addresses against the Company record which have been marked with the invoice address set to 'Yes':
Invoice Method:
Margin only is for instances where you bill the customer for the difference between charge and pay. There is no payment to the contractor.
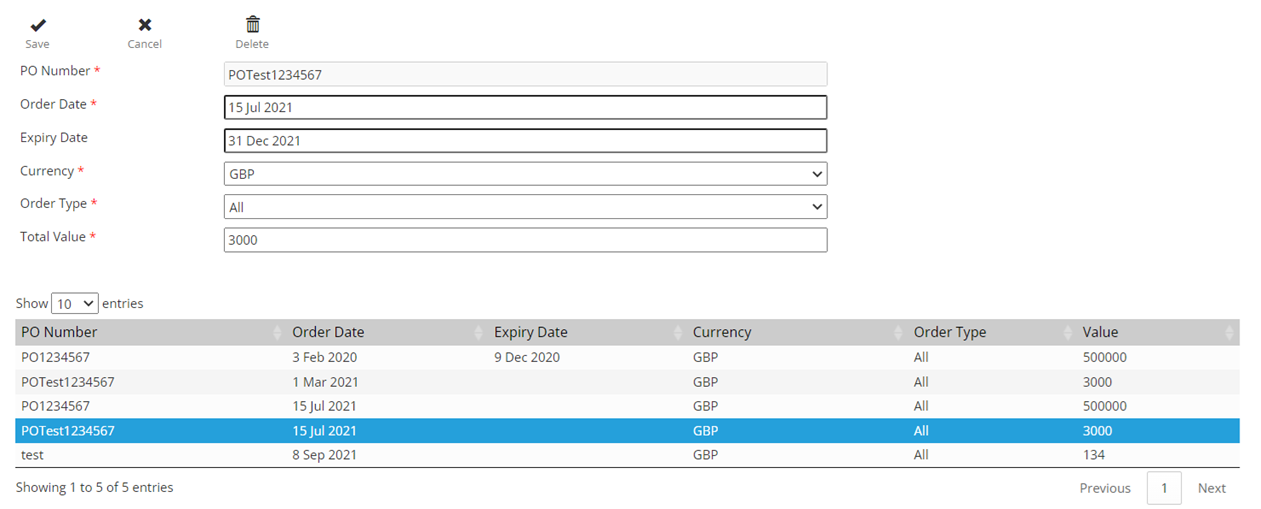
The Purchase Orders listed against a Company are later accessed from the Placement record. Access to these details can be controlled via a User Group Permission to ensure only authorised users have access to this information. When in a Company, go to 'View More' and select 'Purchase Orders':
A Purchase Order cannot be deleted once associated with a Placement.
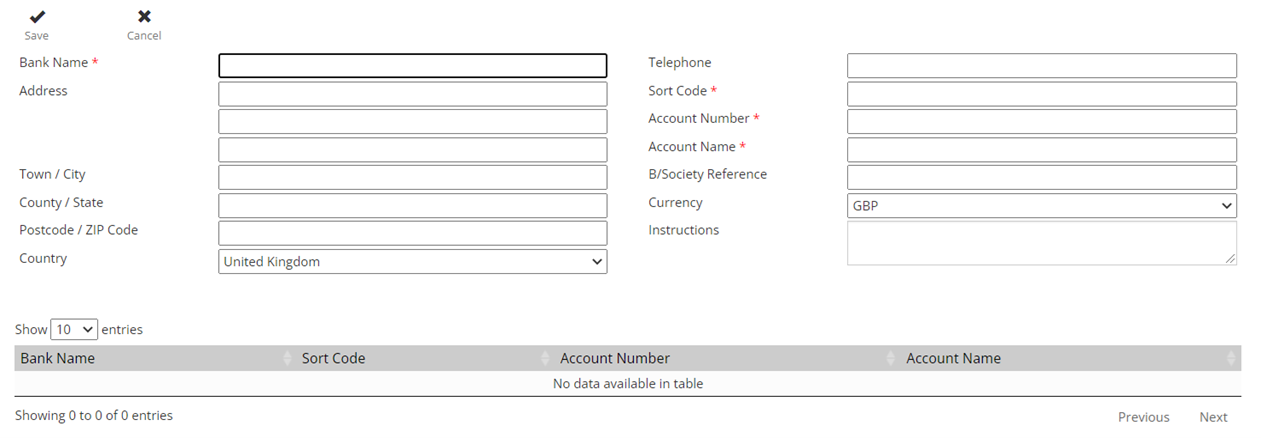
A Company's Bank Details can be stored against the Company record. All details are stored with encryption to ensure maximum security. Access to these details are also controlled via a User Group Permission to ensure only authorised users have access to this information. When in a Company, go to 'View More' and select 'Bank Details':
 Placement Placement
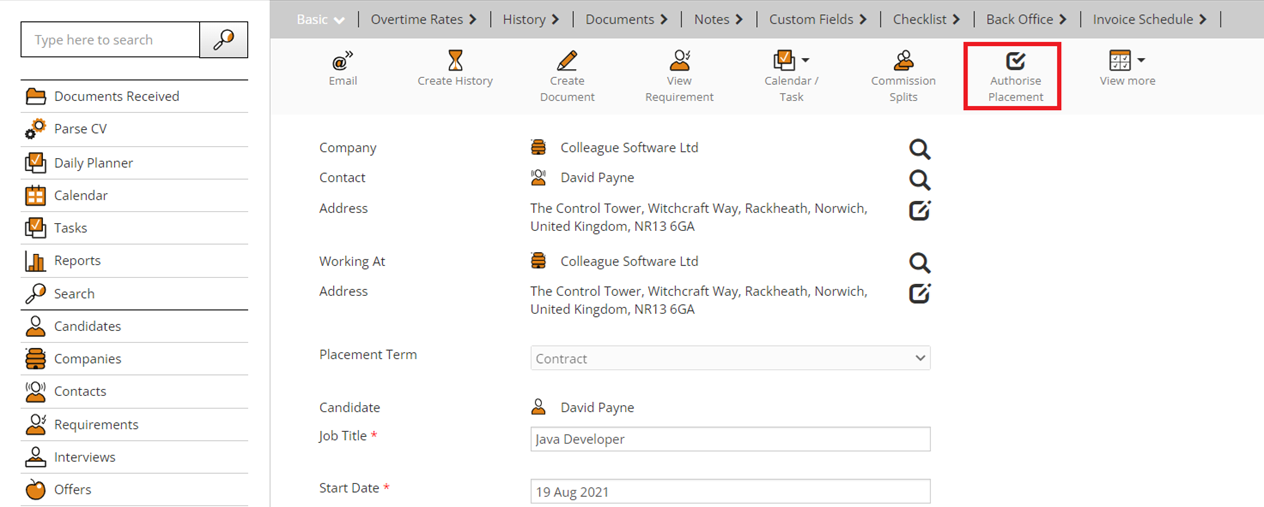
Once an Offer record has been accepted, the process creates an 'Unauthorised Placement'. An unauthorised placement is when the placement is still modifiable on all tabs and fields. The specific details of the Placement are being collated/agreed and it is being reviewed by a Line Manager for authorisation. Upon agreement that the Placement is ready to be authorised, you can click on 'Authorise Placement':
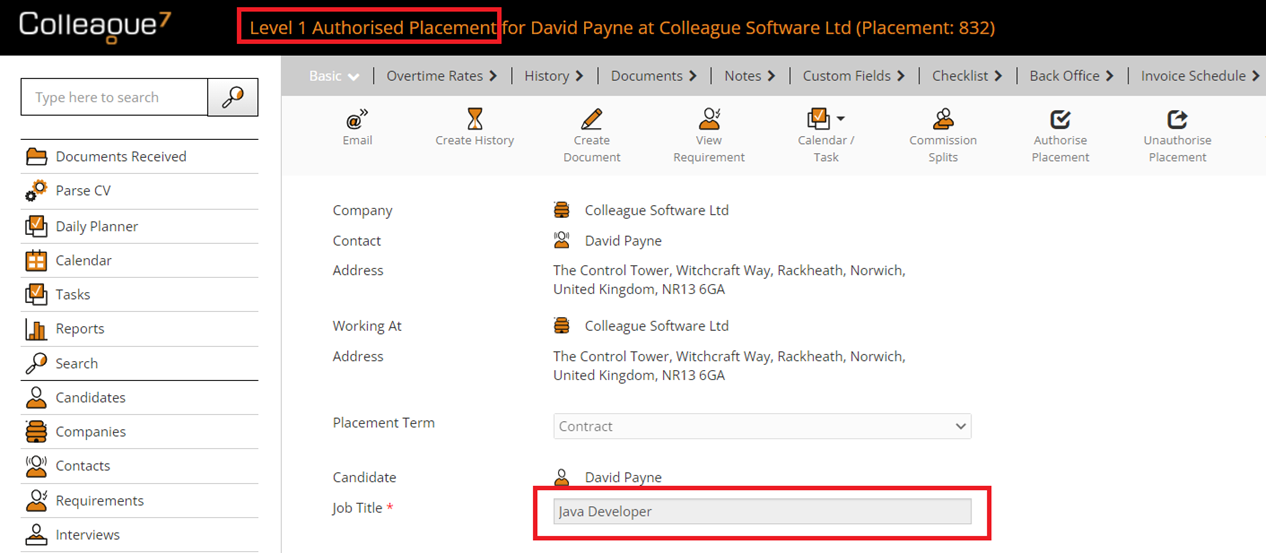
This will take the Placement to 'Level 1 Authorised'. This means that all of the fields and tabs are now locked down with the exception of the Back Office tab:
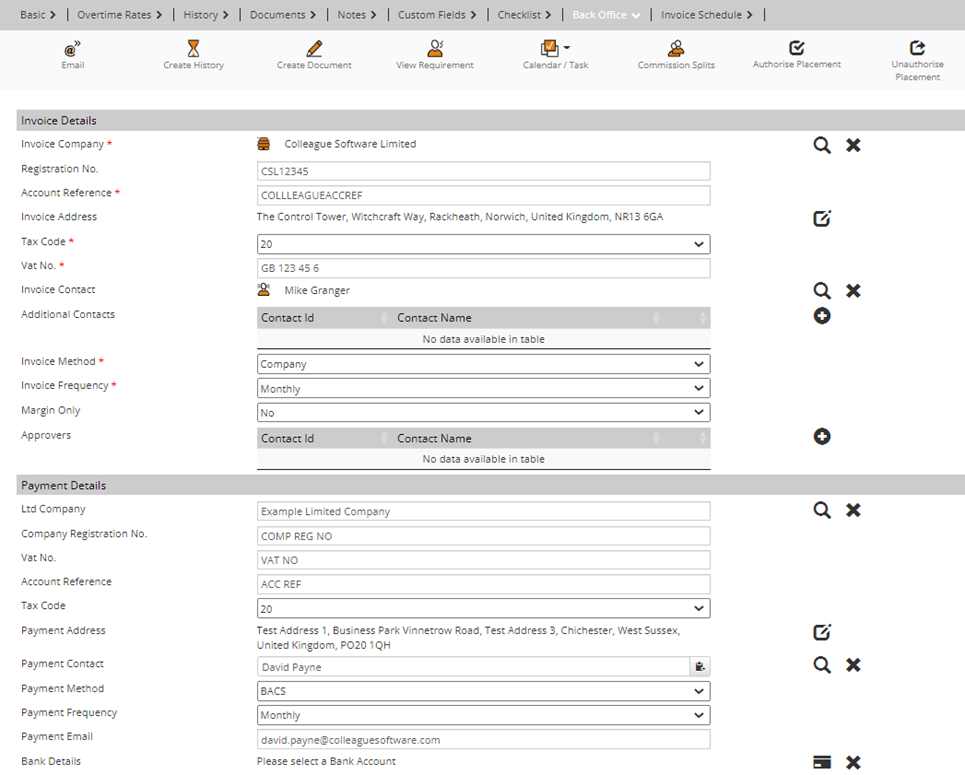
The Back Office tab is populated when the Placement is first made with the default contents of the Candidate's Payment Details and Company's Invoice Details:
Within this tab, the Back Office users will verify that they've got all they need and everything is accurate before authorising the Placement. Authorising a Placement will then take the Placement record to being '2nd Level Authorised'.
A Permanent Placement which is 2nd Level Authorised is ready to be invoiced. A Contract Placement which is 2nd Level Authorised is ready for Timesheets and/or Charges to be added.
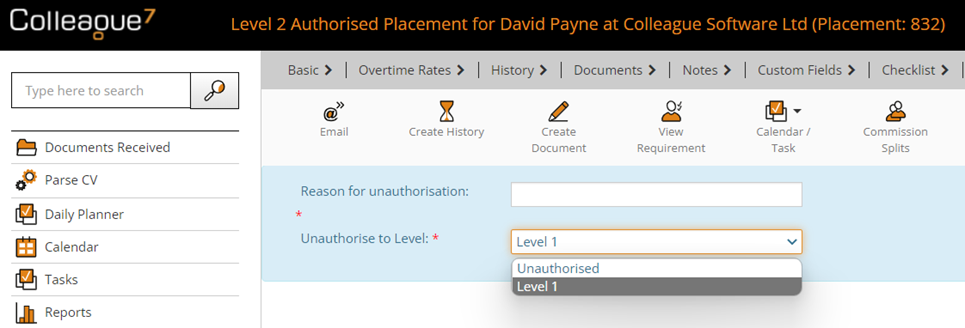
In the event that the details of a Placement have changed, a Placement will need to be 'Unauthorised' before these changes can be made. The ability to 'Authorise' & 'Unauthorise' Placement records is controlled via a User Group Permission to ensure only specified users are able to make this change. When unauthorising a Placement record, you will need to specify the 'Reason for unauthorisation' (this is recorded as a history log against the Placement). You can also specify the authorisation level:
There are also other User Group Permissions which grant a user's ability to unauthorise a Placement if invoices have begun being raised against the Placement.
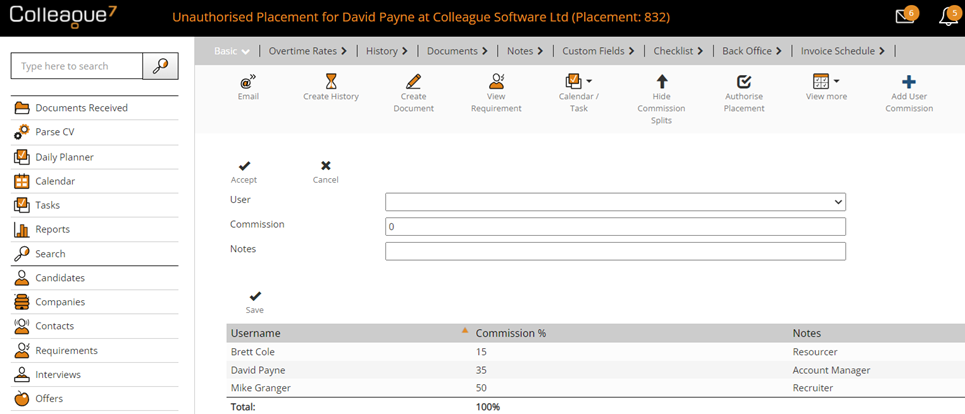
The allocated percentage of Commission associated with a Placement is defined within 'Commission Splits'. Within this area, you can list the associated Users and their commission percentage entitlement in relation to the Placement record.
Once all users and their associated percentage entitlements have been added, press 'Save'. The total commission percentage of all users must add up to 100%.
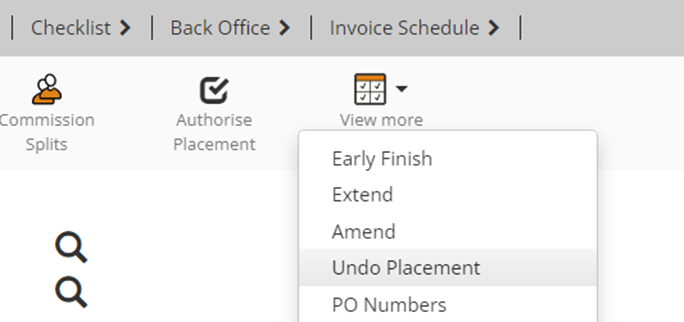
In the event of a Placement being a non-starter, provided the Placement has been fully unauthorised, from the 'View More' menu press 'Undo Placement':
This will delete the Placement record.
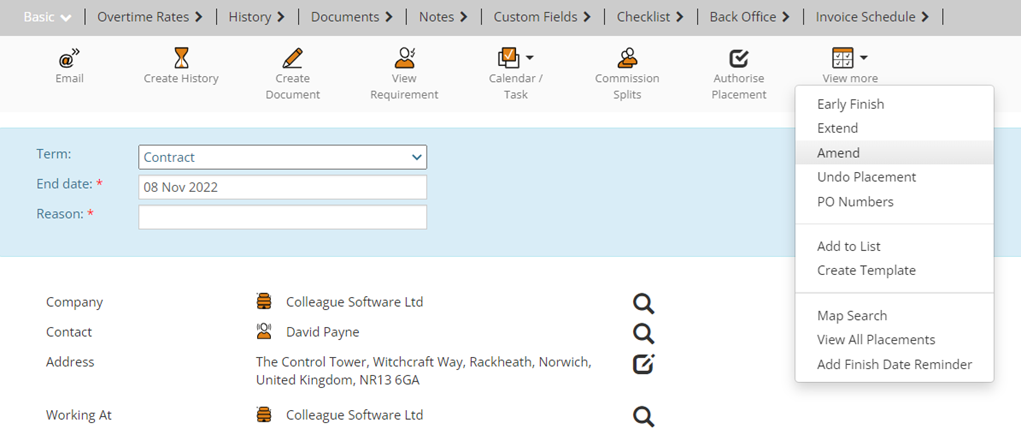
For a full audit trail, in relation to the history of a Contract's adjustments, should the details of the Placement need to change, you can run the 'Amend Placement' workflow. When in a Placement, from the 'View More' menu press 'Amend':
This allows a user to specify whether the 'Term' has changed (to cover Contract to Perm, or Fixed Term Contract scenarios). You then specify the end date of the original placement. The new placement will start from the day after the specified end date and carry on up to the original placement end date. You will then need to enter the 'Reason' for the amendment. This process creates a new Placement record, which is now the new current Placement within the Placement's hierarchy. A Placement's hierarchy will consist of Placements, Amendments, Extensions and Early Finish records.
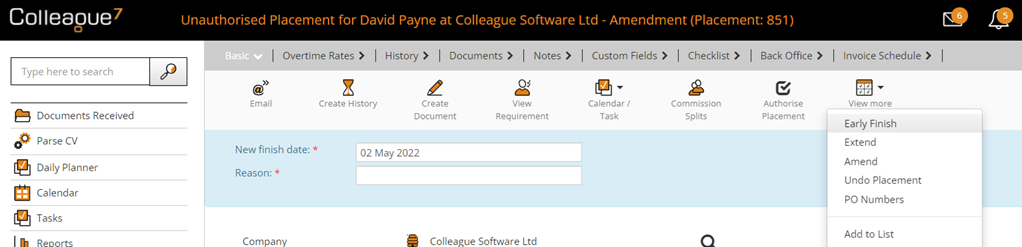
In the event of a Placement starting but then finishing before the contracted end date, a user can run the 'Early Finish' workflow. When in a Placement, from the 'View More' menu press 'Early Finish':
This allows you to specify the end date (finish date) of the Placement. This will update the existing Placement with the new specified end date and record the event in the Placement's history.
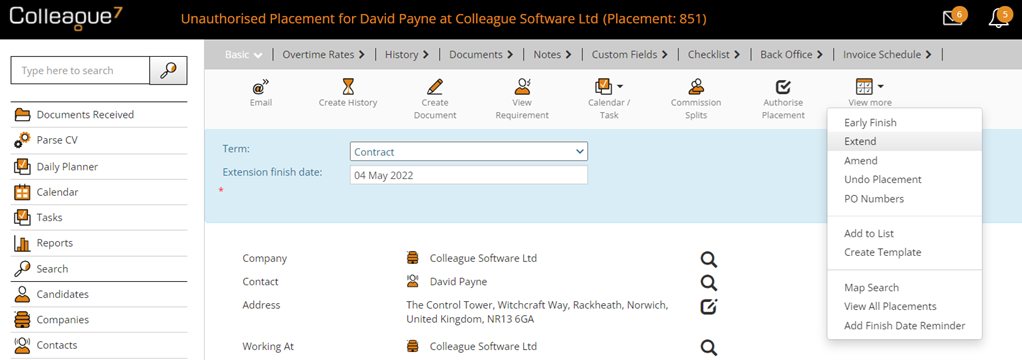
In the event of a Placement extending beyond the duration of the original contract, a user can run the 'Extend Placement' workflow. When in a Placement, from the 'View More' menu press 'Extend':
This allows a user to specify whether the 'Term' has changed (to cover Contract to Perm, or Fixed Term Contract scenarios). You then specify the new Extension finish date of the placement. This will create a new 'Extension' placement which will start from the day after the end date of the original contract up to the specified Extension finish date. There is also a Global Setting to specify whether an Extension should create an Offer record first, this is to allow for the Accept/Reject workflow of an Offer to be incorporated into the process (disabled by default). The new 'Extension' Placement will now be the current Placement within the Placement's hierarchy. To view all Placements within a Placement's Hierarchy, off the 'View More' menu, select 'View All Placements'.
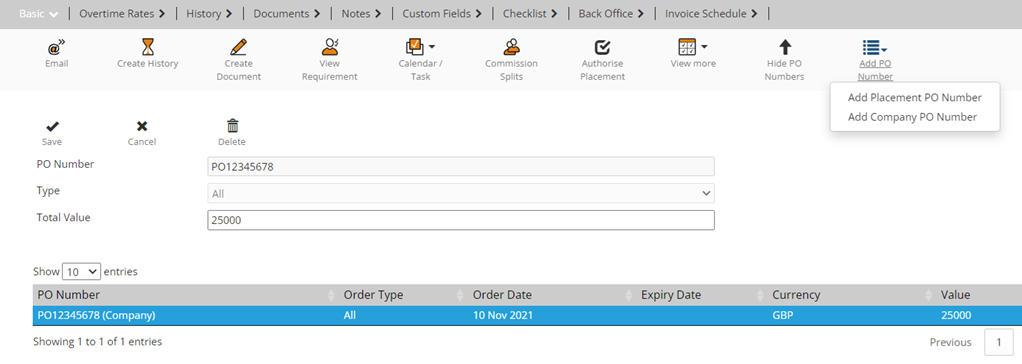
Users can assign PO Numbers specific to the Placement or Company. When in a Placement, from the 'View More' menu select 'PO Numbers': This gives you a table of the PO Numbers associated to the Placement. You can then 'Add PO Number' and choose whether it is a Company PO Number (as referenced in the Company section of this document) or a Placement PO Number.
There is a User Group Permission which authorises a User to add PO Numbers to '2nd Level Authorised' Placements. PO Numbers which have been added to a Placement can then be referenced when entering a Timesheet.
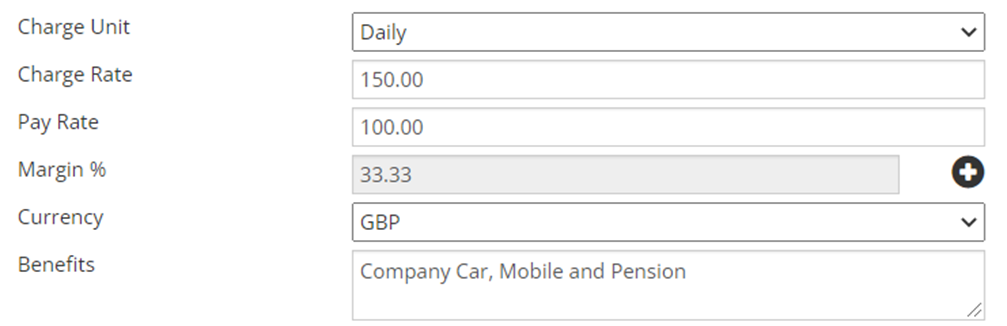
The Standard Charge Rate and Pay Rate of a Contract Placement is entered as part of creating the Offer record. This is then held within the Basic tab of the Placement:
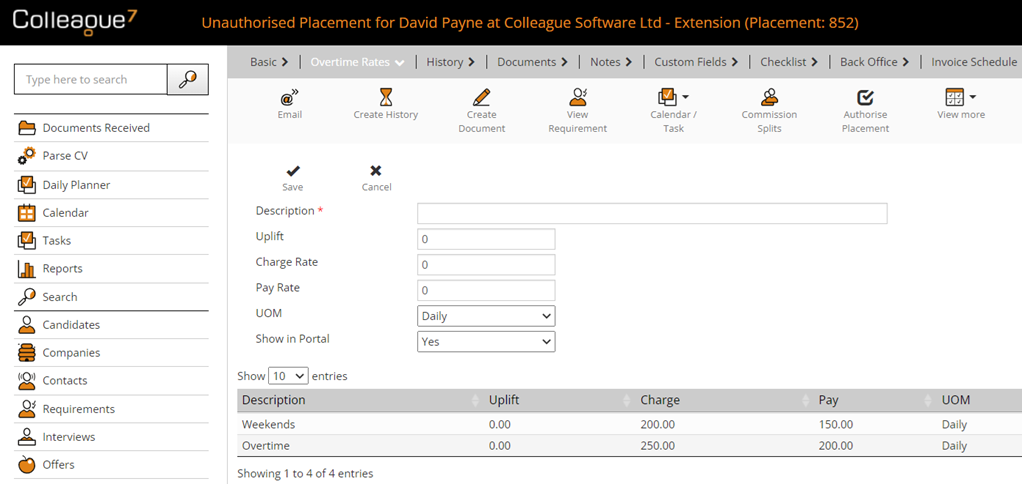
All other Placement rates are held on the 'Rates' tab. If the Rates have been added on the Requirement or in the Offer Record, these will be copied over to the Placement. If not, any additional rates can be added to the Placement:
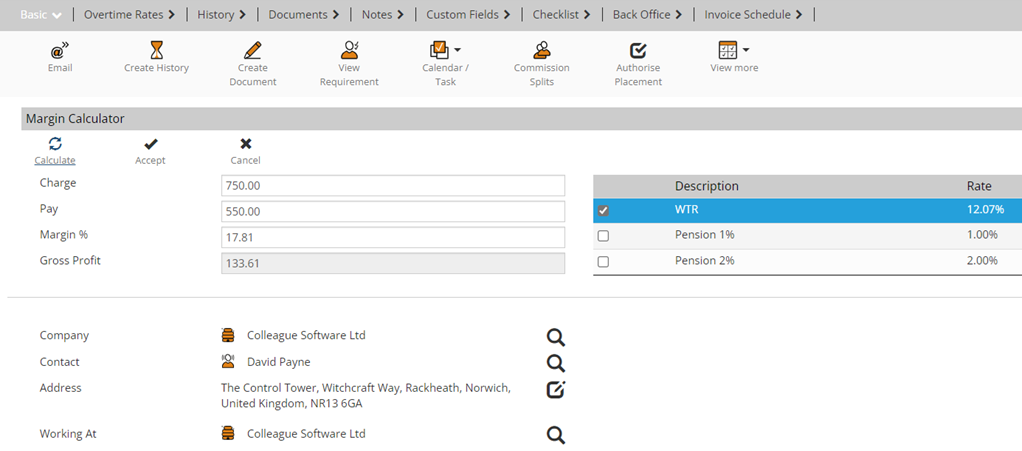
In the event that a Contractor has the Payment Method: PAYE, when accessing the Margin Calculator (via the plus icon next to the 'Margin %' field), a user will be able to specify the additional Pay based rates that will need to be taken into account in order to calculate an accurate 'Gross Profit' to the Placement:
This is for reporting purposes only.
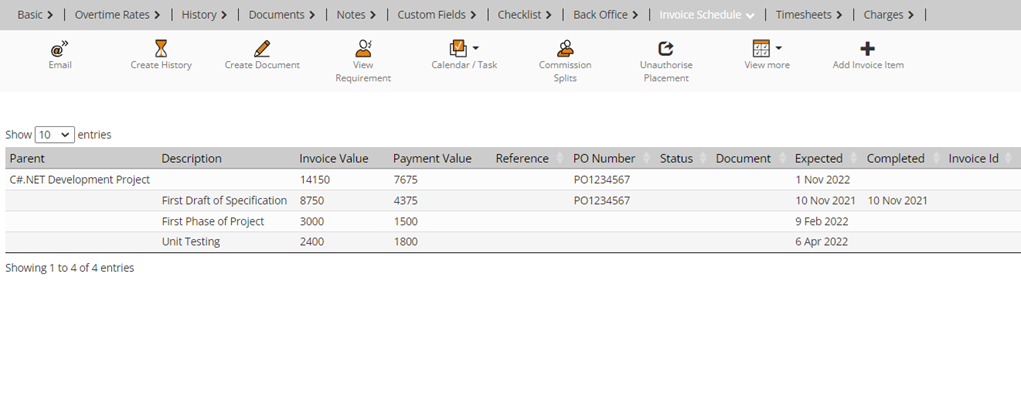
The Invoice Schedule is designed to enable Back Office with the ability to invoice milestones which have been achieved against the Placement record. Within the Invoice Schedule there is the ability to add Parent & Child Invoice Items. Parent items will be the total invoice value of the child items within its folder. Upon delivery of a child invoice item, it is marked as 'Completed', which releases the item to be invoiced via Back Office.
There is a User Group Permission which determines whether a user has access to view the Invoice Schedule tab and another permission to Add/Edit Invoice Items.
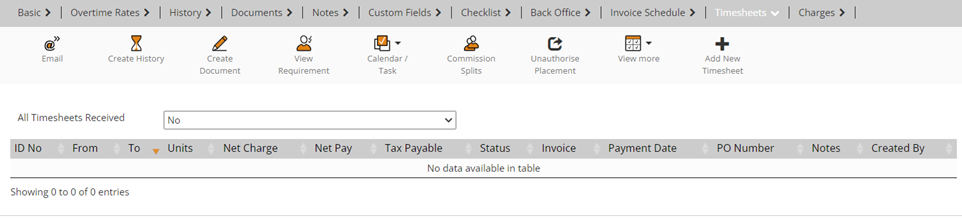
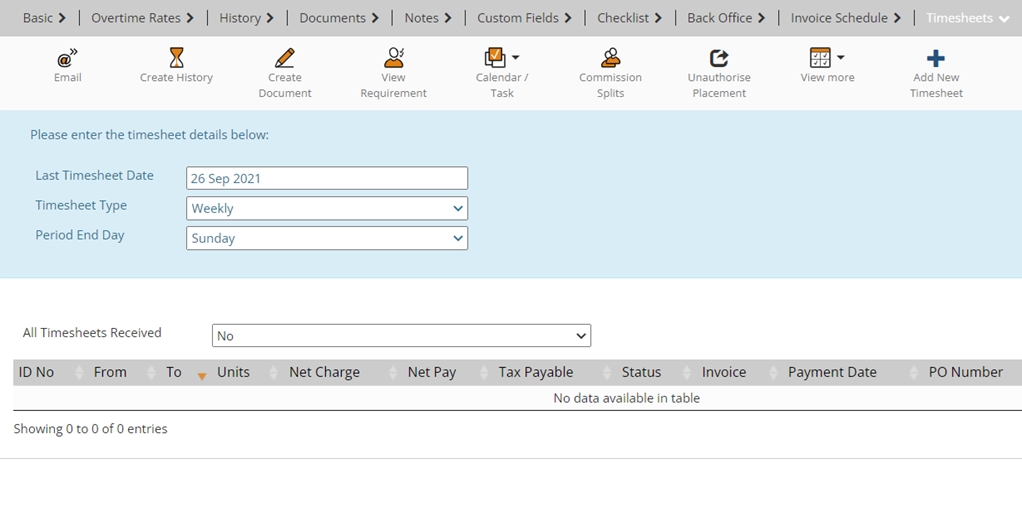
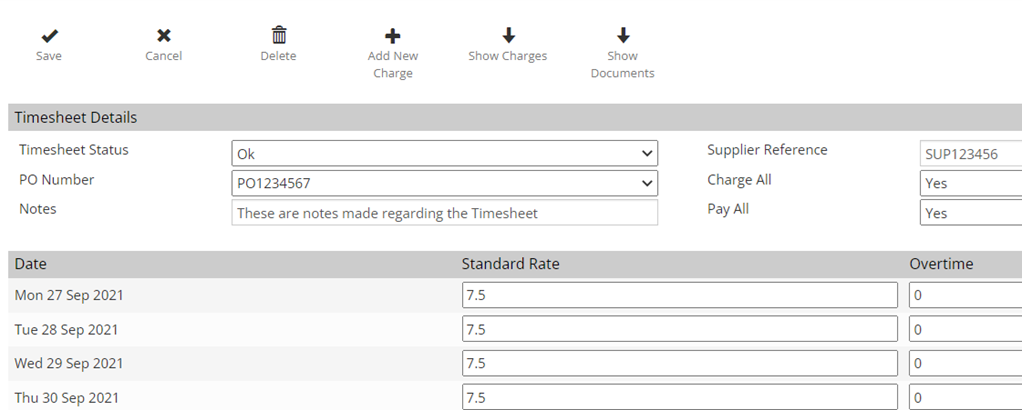
For Contract Placements, the key component driving invoice generation is the timesheet area. The Timesheets tab will become available when a Contract Placement is at 2nd Level Authorised. When accessing the Timesheets, if you wish to add a Timesheet, press 'Add New Timesheet':
The 'Last Timesheet Date' will be the day before the start date of your timesheet. If it is the first Timesheet of the Placement, the Last Timesheet Date will be the day before the start date of the Placement. Once Timesheets have begun being added to the Placement, the 'Last Timesheet Date' field will be the last day of the previously entered timesheet. The Timesheet Type field consists of three options:
The Period End Day defines the end of a week from the perspective of the timesheet. This is set by a Global Setting, and will often be left as default, but is available in case a unique instance requires a different Period End Date.
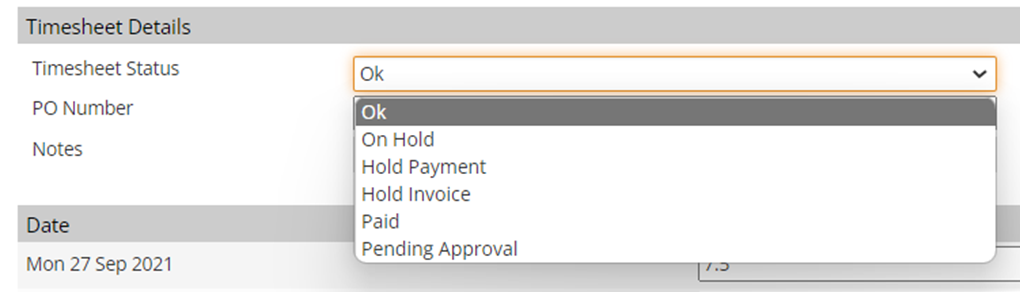
The 'Timesheet Status' field can be used to define various statutes of Timesheet:
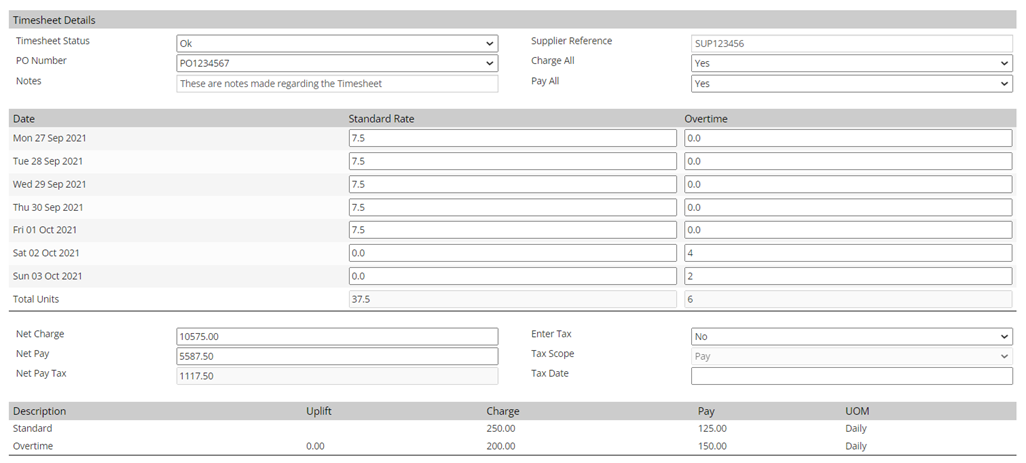
The PO Number dropdown will list all the PO Numbers against the Placement/Company. The Supplier Reference is an optional field for tracking any necessary reference number in relation to the supplier. The 'Charge All' field defines whether the timesheet is chargeable and will dictate whether it appears within the Back Office area under the 'Generate Invoices' area. The 'Pay All' field defines whether the timesheet is payable and will dictate whether it appears within the Back Office area under the 'Generate Payments' area. The Timesheet table will list the dates within the specified range of the timesheet with a column existing for each rate associated to the Placement. Enter the units as required. The Net Charge, Net Pay and Net Pay Tax will be automatically calculated based on the units entered into the Timesheet. Setting 'Enter Tax' will allow you to modify the 'Net Pay Tax' value as well as set whether the Tax Scope is Pay, Charge or Both. The Tax Date can also be recorded for your records. Beneath the Timesheet values you will see a table of the rates associated to the Placement for your reference. Press 'Save' to add the Timesheet to the Placement. Once the Timesheet has been saved, you will be able to open the Timesheet and see other options available to you.
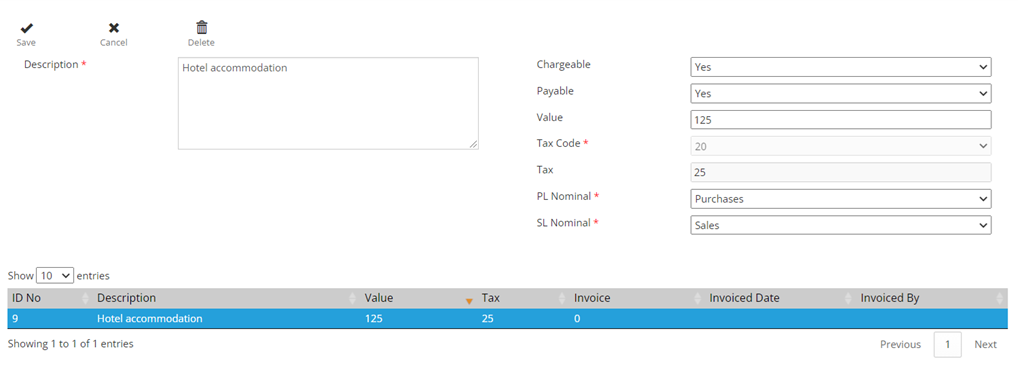
These are namely the ability to add a Timesheet Charge and the option to add any supporting Documents to the timesheet. Click on 'Add New Charge' to add a Charge specific to the Timesheet:
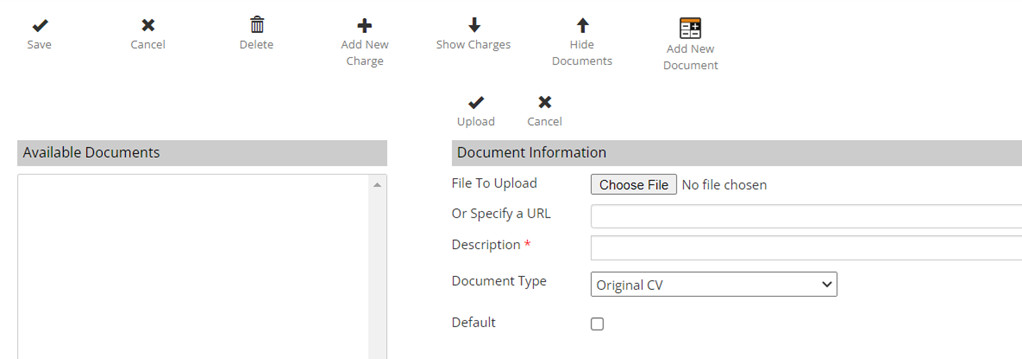
Click on 'Show Documents' & 'Add New Document' to add supporting documents to the Timesheet:
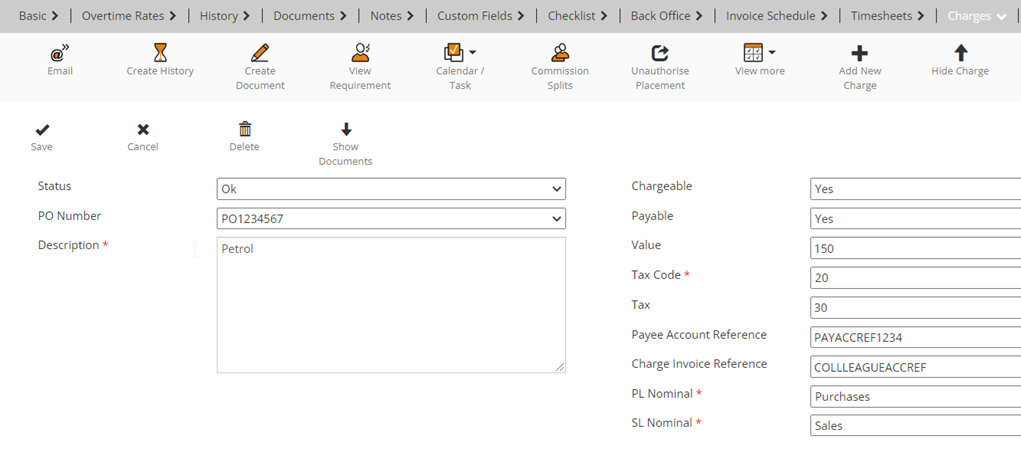
Charges can be added to a Timesheet or Placement. Within Timesheets, a Charge is added as per the above instructions. From within the Placement there is a 'Charges' tab which allows a user to enter any specific charges they need to raise with the client in relation to the Placement.
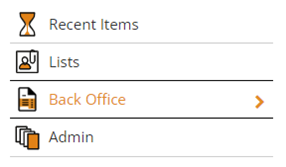
Like with a Timesheet Charge, this includes the option to add any supporting documentation in relation to the charge via 'Show Documents' and then 'Add New Document'. Back OfficeAccess to the Back Office area is authorised via a User Group Permission. From the main navigation menu select 'Back Office'
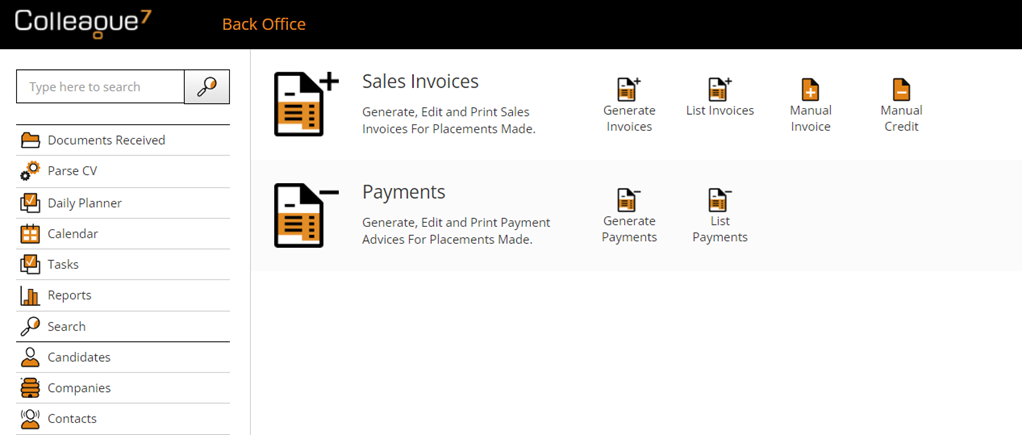
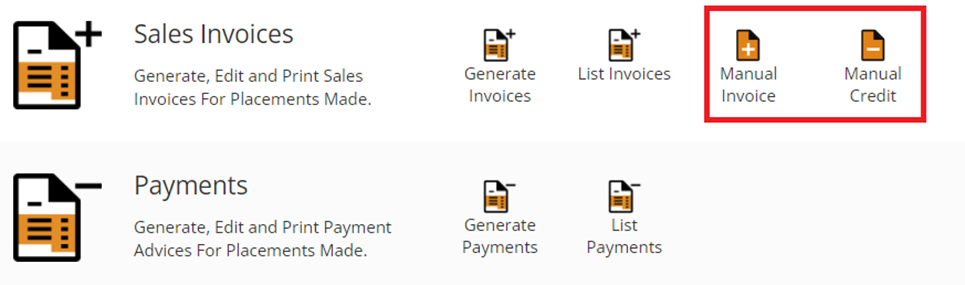
Within the Back Office page, a user will find a 'Sales Invoices' row, consisting of features designed to cater sales invoicing and a 'Payments' row for the processing of payments.
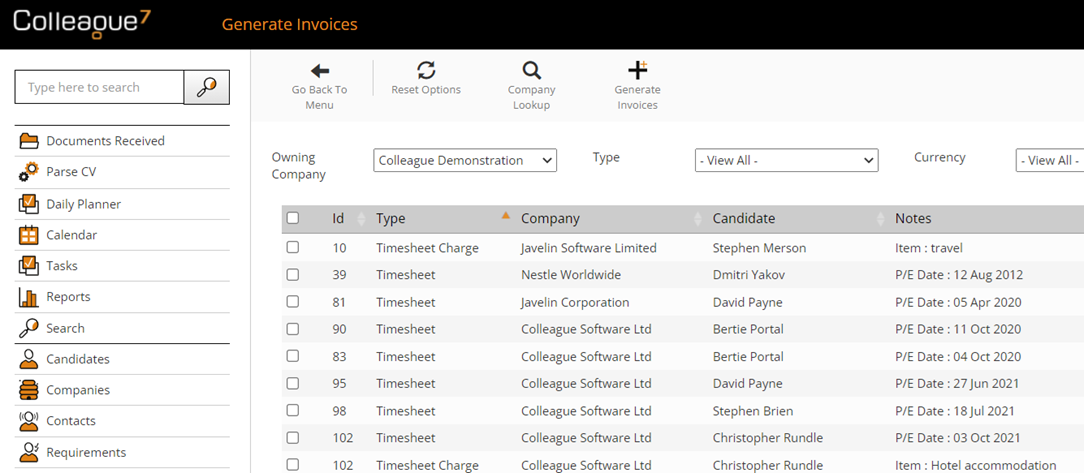
Within the Generate Invoices page, you will find a table listing all of the chargeable Timesheets, Charges, Fixed Term Contracts, Invoice Schedule Items and Rebates that are still yet to be processed.
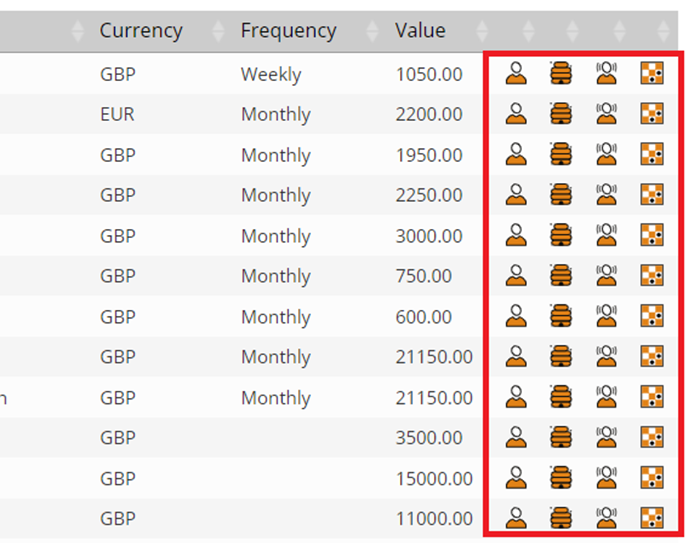
Access to the various associated records to these items can be achieved by clicking the icons on the right hand side of the table:
Filters are available at the top of the table to group the records based on your needs. This includes the ability to lookup a Company and find only outstanding items to invoice against that Company.
Tick the items you wish to invoice and press 'Generate Invoices':
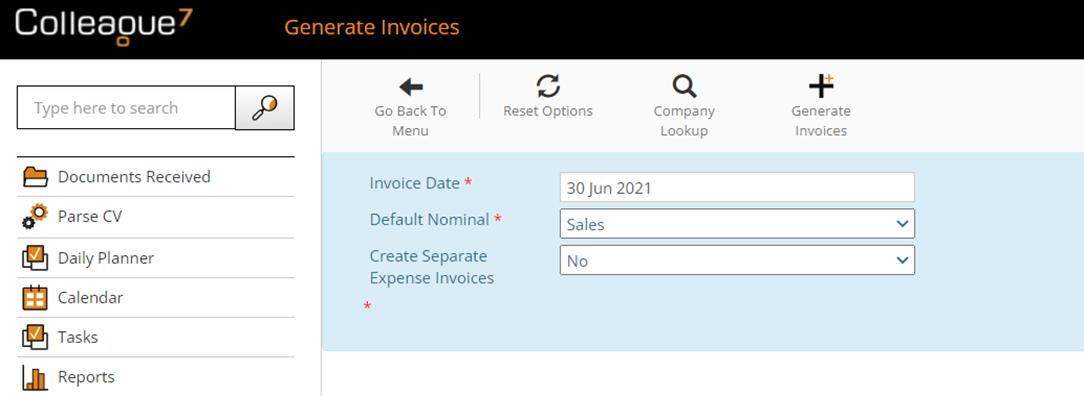
You will be able to set the 'Invoice Date' for the Invoice Records which will now be generated. The 'Default Nominal' is the Nominal Code that will be used in the event that the Nominal Code settings which have been configured, do not cover the records being processed. The 'Create Separate Expense Invoices' option, if set to 'Yes', will create separate invoice records for any associated Charges linked to a Timesheet. Press 'OK' and this will generate the invoice records. Upon completion, the selected records in the 'Generate Invoices' should disappear and you will be given an option to view the invoices within the 'List Invoices' area:
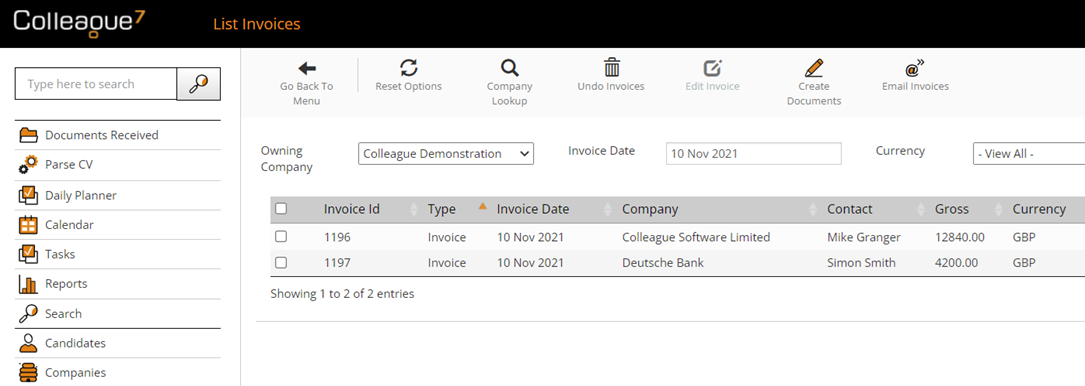
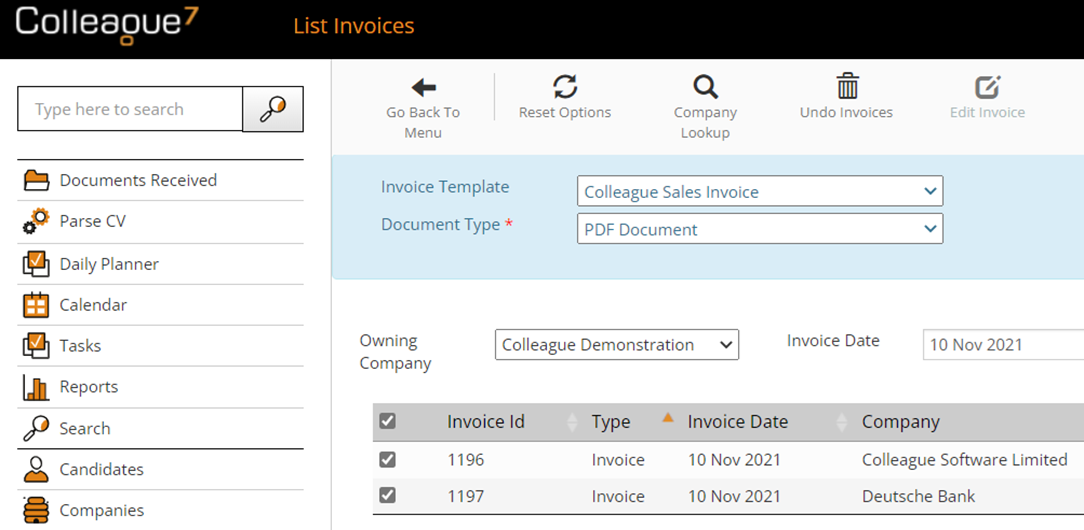
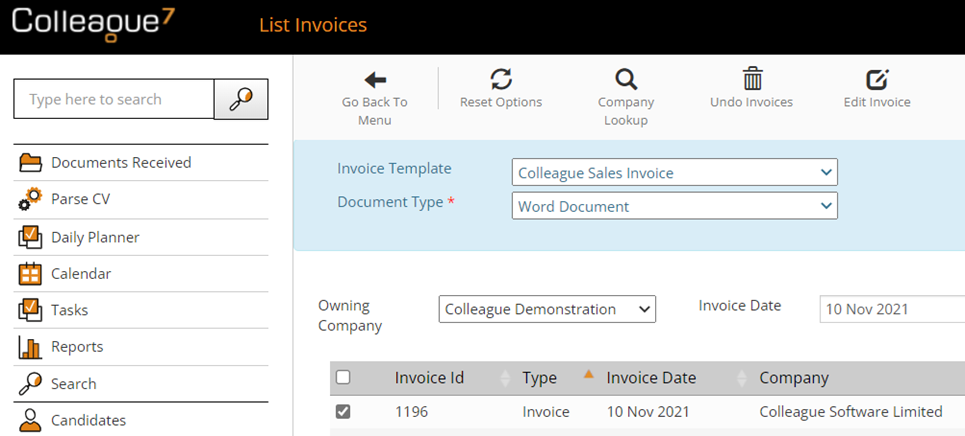
The List Invoices area is a view of all invoice records created on the system. It begins filtered on today's date, but will update based on the selected invoice date to show all invoices from then to today:
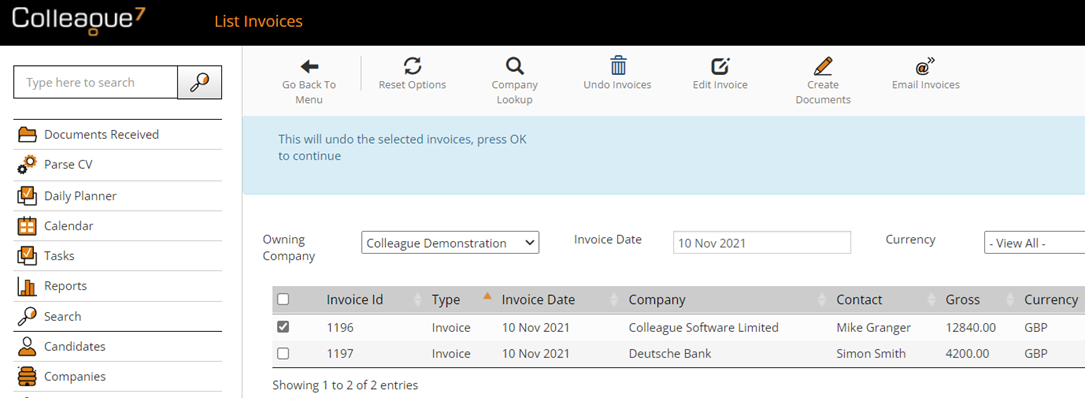
If you have generated an invoice in error, you can select the invoice(s) and press 'Undo Invoices':
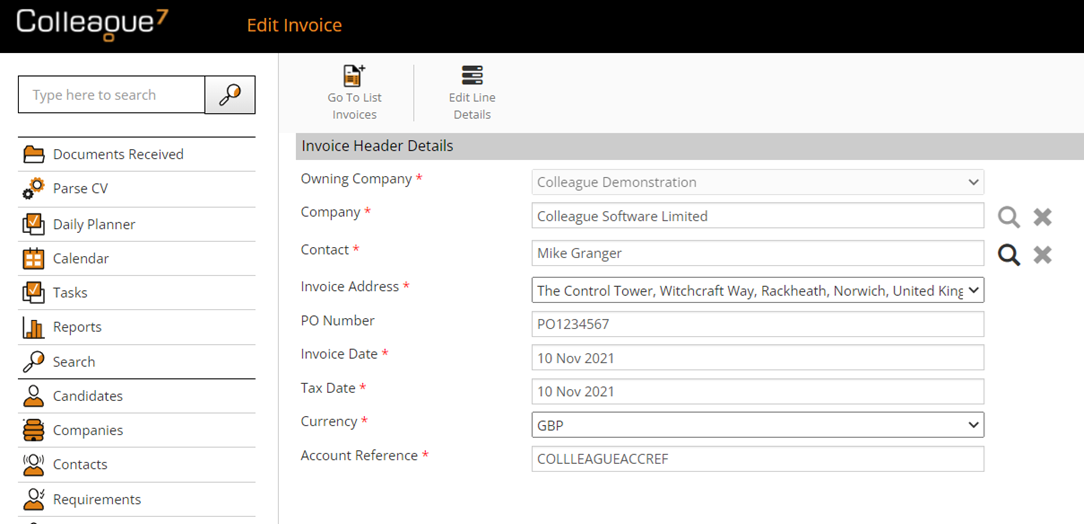
This will remove the invoice record and return the invoiceable item back to the 'Generate Invoices' page. If you wish to edit an invoice or view the line details of the invoice record, tick the invoice row and select 'Edit Invoice':
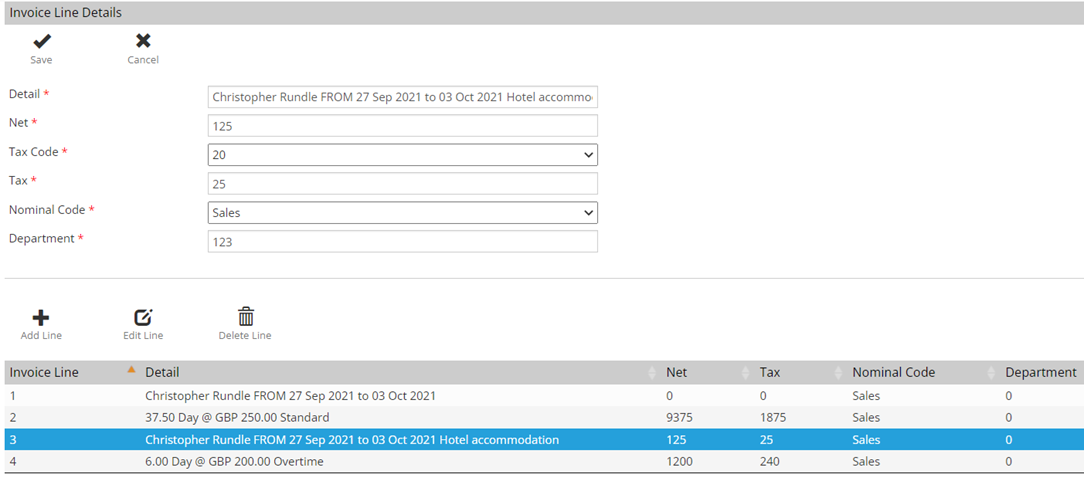
When in an Invoice record, click on 'Edit Line Details':
From here, you can edit any of the necessary line detail as and when required. If you wish to 'Print' the invoice, tick the necessary invoice(s) and select 'Create Documents'. This will allow you to select the necessary invoice template for the invoice records:
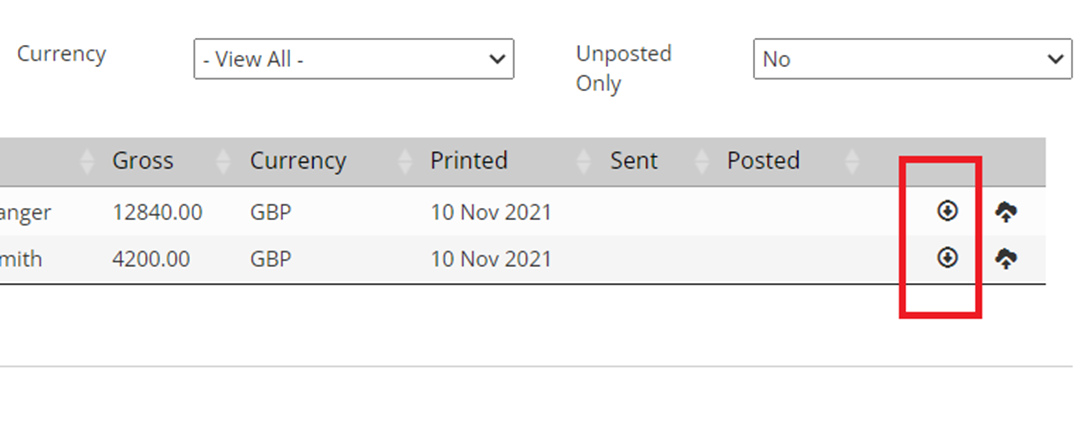
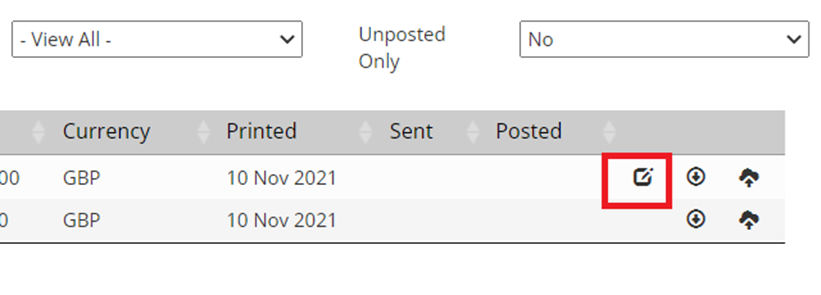
Once the invoices have been generated, you can access the document via the icons on the right hand side:
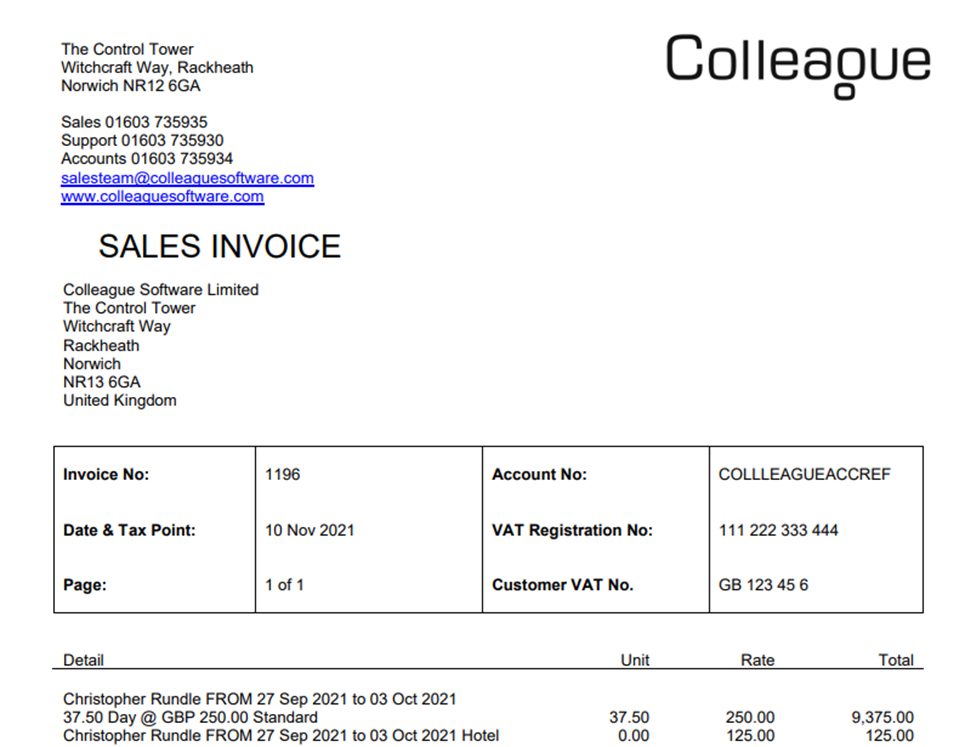
Example invoice record:
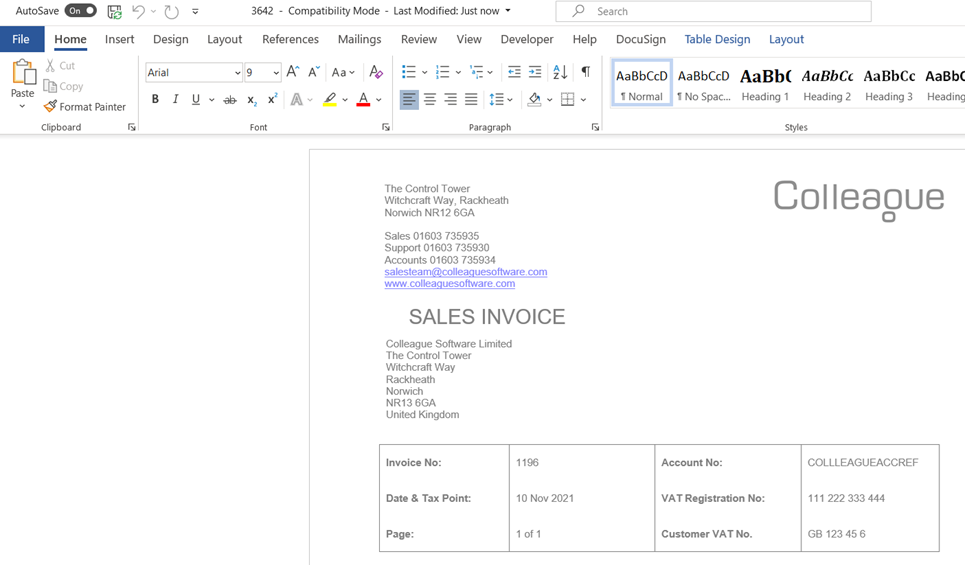
If you wish to edit an invoice document, you can generate the document in a Word document.
Editing an invoice document in Word is done so via this icon:
You can then edit the invoice as required and 'Save As' PDF:
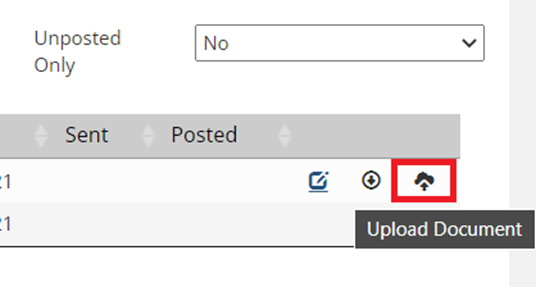
Manually edited invoice documents can be uploaded back to the Invoice Record using this icon:
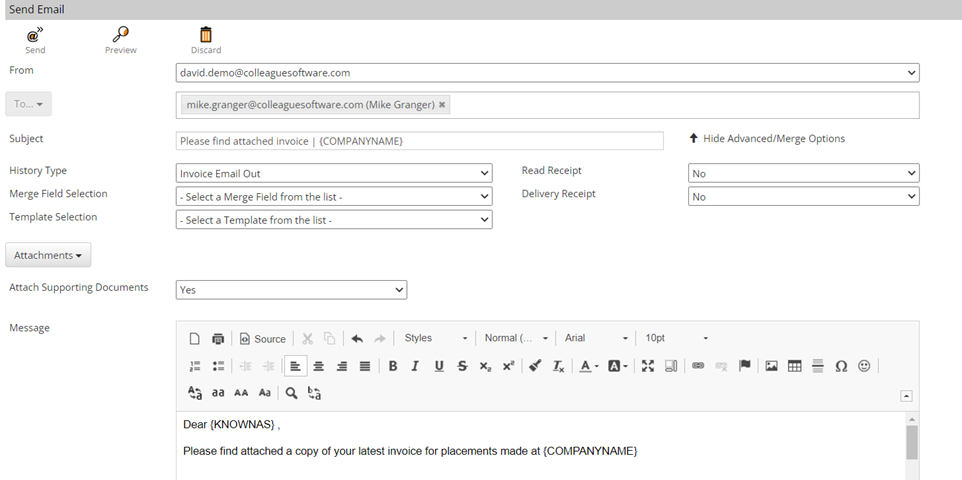
When ready, the next stage in the process is to email the Invoice Contacts with their associated invoices. To do this, tick the necessary invoice records and tick 'Email Invoices':
Included within this option will be the ability to 'Attach Supporting Documents'. This ensures when the email is sent, alongside the invoice documents any associated supporting documents (attached to the Timesheet or Charge) will be included as an attachment.
If you wish to create a manual invoice or credit, you can do so from the main 'Back Office' page:
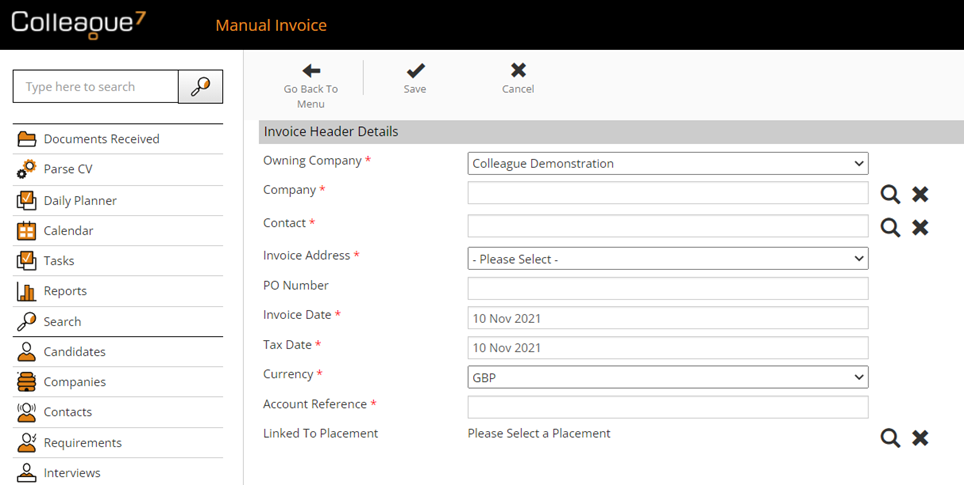
You will first need to enter the 'Invoice Header Details':
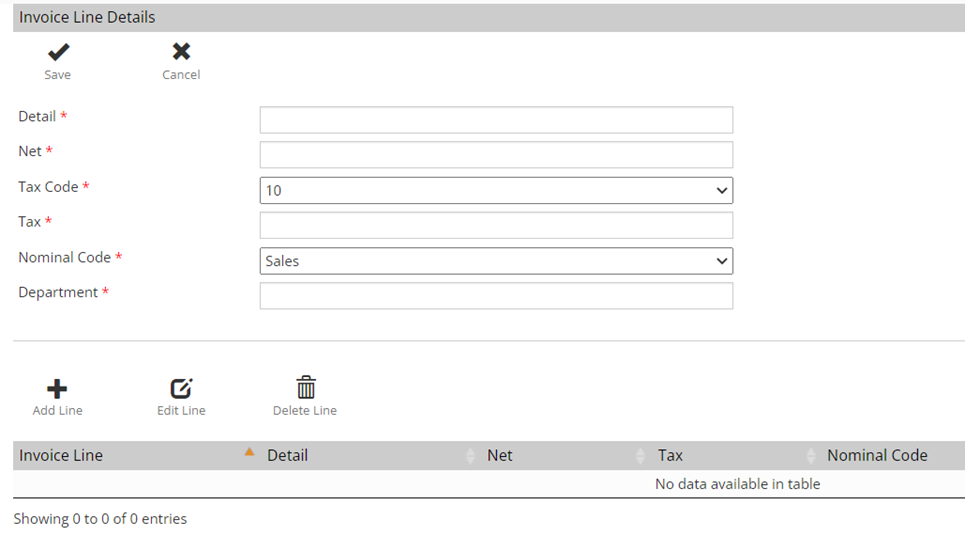
Press 'Save' and this will load the 'Invoice Line Details':
Here you can add the necessary invoice lines in relation to the invoice (or credit). In the event of a credit, the entered value will be converted into a negative value.
|